
Mapping Table is nothing but a modified version of Vlookup function which we used in MS excel. The complex data model can be simplified by using the mapping table along with ApplyMap() function … It helps us in reducing the number of tables involved in the data model by providing an alternate way of performing joins between the columns of two different tables based on a common key column. It also helps us in cleaning up or fixes the dissimilarities in the source data by modifying the field values as per the requirement.
Mapping Table Explanation:
If we want to map the values of a column from one table to another then we need to create a mapping table which should contain only two columns.
- The first column should be the common key column or lookup field
- The second column is the desired column which needs to be mapped into another table.
Now, comparison is made between the common fields from both the tables to match its field values. If the matching value exists in the key column of mapping table then it fetch its corresponding value from second column in the mapping table and this second column is mapped to the desired table using ApplyMap function.
Pictorial View:
 ApplyMap (‘Mapping Table Name’, Column a, ‘default value’)
Maps column B to desired table.
Mapping Table Syntax:
The Mapping table is a temporary table which always starts with a keyword “Mapping” before load statement. It should have only two columns and the data source of mapping table can be a database, excel sheet, resident table, inline table or a QVD file.

Tip: The mapping table name should be prefixed by “MAP_”, so that it will be easier for us to distinguish the mapping tables in the script.
ApplyMap function:
ApplyMap function is a lookup function used to map the column to the desired table using mapping table columns. The syntax of ApplyMap function works on the following three parameters.
ApplyMap (‘Mapping Table Name’, Common Key Column, ‘Default Value’);
- Mapping Table Name – The first parameter is the name given to the mapping table it tells qlikview that to which mapping table we need to apply lookup function. The table name should be written under single quotes.
- Common Key Column – The second parameter is the first column of the mapping table which is nothing but a look up column or key column.
- Default Value – The third parameter is the default value which is optional and used to handle the null values when no match is found between the common key columns of two tables.
Let’s elaborate Mapping Tables and ApplyMap function with examples:
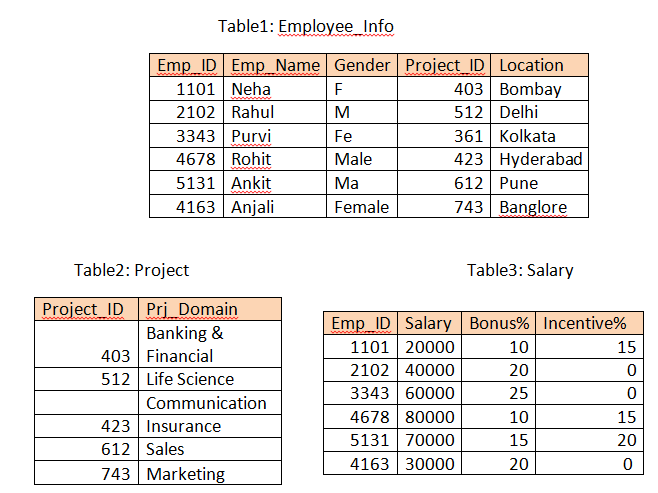
Scenario: Suppose we have three tables that contain the employee’s personal, project and salary information. When we load the below tables in QlikView, it will generate a data model with three tables which are associated through a common key column with each other.
Now we want to reduce the no. of tables from the data model to make it simple and more understandable without using joins. To do so we will use Mapping Tables and ApplyMap () function.
Case-1: Merge the column Prj_Domain from Project table and Salary from Salary table into Employee_info table to reduce the no. of tables from the QlikView data model.
Step-1: Create mapping tables as shown below:

Here, the first column I.e. Project_ID from Project table and Emp_ID from Salary table are the common key columns used in Employee_info table and the second column I.e. Prj_Domain field and Salary field are the columns which need to be mapped to employee_info table.
Step-2: Load employee table from source file and by using ApplyMap function, map the Prj_Domain field and Salary field into Employee_info table.
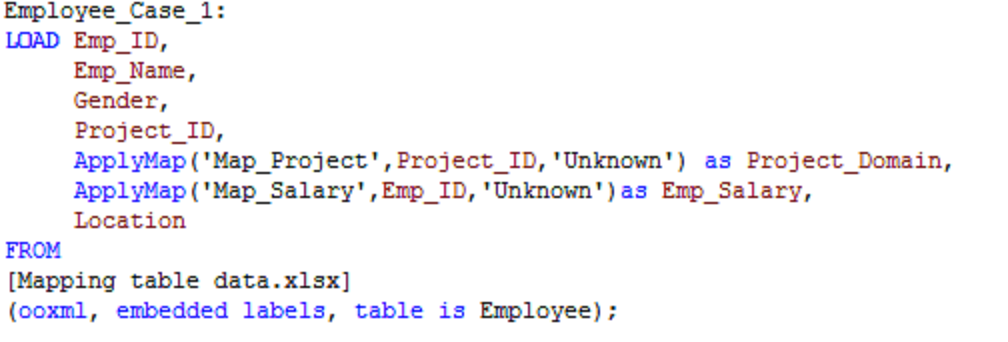
Prj_Domain field and Salary field has been loaded into Employee_info table without using joins.
Step 3: Save and reload the Script and check the data model which is being loaded as a single table with required fields instead of 3 tables.
Case-2: Remove the dissimilarities between the data values of gender column under Employee_info table.
Step 1 : Create Mapping Table as shown below:

Step 2: Now, under already loaded Employee_ info table, add a field using ApplyMap function to fix the dissimilarities between the data values of gender column.

Step 3: Save and reload the QVW file and check the new column named Gender_Fix in which all the data discrepancies has been fixed..you can comment out the old gender field from the Employee_info table.
Case-3: Now, company has decided to give bonus to all the employees and incentives to those who have achieved their yearly goals. We will use incentives given to the employee when exists else will use bonus to calculate the gross salary.
Step1: Create Mapping table for both Incentive% and bonus% fields respectively.
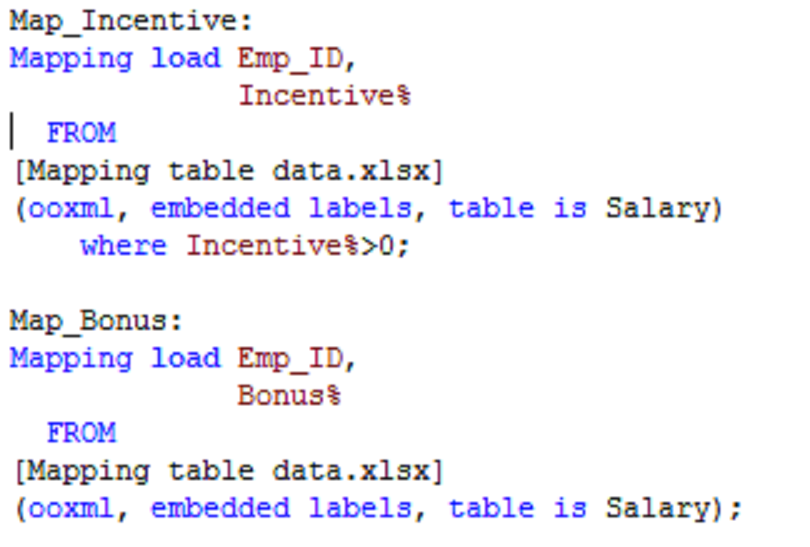
From Incentive% field we are fetching only those employees who got incentives.
[NOTE: we can create multiple mapping tables out of single table]
Step 2: Now, we will use nested ApplyMap function to fulfil our requirement and to calculate the gross salary of the employee. (Gross Salary = Salary + Salary *Increment /100)

Step 3: Save and reload the script to get the Gross_salary of the employees as per the required conditions.
Here is the data model of above example which is being simplified by using Mapping table and ApplyMap function.
Old Data Model

New Data Model

Points to Remember:
- A Mapping table should be loaded before using the ApplyMap function.
- Mapping table should have only two columns.
- First Column in the Mapping table should be a Key field.
- Mapping Keyword is compulsory before loading any mapping table.
- You cannot use ApplyMap function when you need more than one corresponding value from the second table (Fetches single value per matching record)
- In ApplyMap Function Mapping table name must be enclosed under single quotes.
Advantage of using Mapping table and ApplyMap Function:
- Helps in avoiding joins in QlikView.
- Helps in reducing tables from the data model to make it simple, efficient and understandable.
- Mapping Table only exist during load.
- In ApplyMap Function missing rows can be handled by its third parameter therefore helps in handling the null values and used in data integrity.
- Ignore the duplicate rows in the fact table.
- We can use composite key as a key column in mapping table.
- We can create multiple maps from the same table.
- It saves memory and processor time.
- It cleans the data by removing the data discrepancies.
I hope by now you have clearly understood the usability and importance of Mapping table and ApplyMap function… 🙂

Thank you priyanka for posting good information about mapping and some other topics.so good priyanka.
LikeLiked by 2 people
My pleasure chaitanya 🙂 please follow my blog for all the upcoming posts…
LikeLike
Hi priyanka, do you have some thing for link tables & synthetic keys and synthetic table.
Please do share with us.
LikeLike
I will try to cover these topics in future…till then keep following 🙂
LikeLike
Nice Post about Mapping Load Chaitanya…………..
LikeLike
helpfull
LikeLike
Hi Priyanka,
Really superb information, why dont you cover rest of the Qlikview topics. It will be more helpful all of us
Thanks
Mohan
LikeLike
nice post,easy to understand.
LikeLike
Hi Priyanka,
I am very new to QlikView I have a scenario could you please help me in getting it.
I have a table in that I have a column say Category and it has values like A,B,C,D but in front end I want to see them as A1, B2, C3, D4.
This renaming of values I managed to achieve by using following function:
if(match(Category,’A’),’A1′,
if(match(Category,’B’),’B2′,
if(match(Category,’C’),’C3′,
if(match(Category,’D’),’D4′,Category)))) as Category
Now I want to group these categories like Group 1 (A and B) & Group 2(C and D)
And in front end I will have 2 filters : Category & Group
which will be like :
Category Group
A1 Group 1
B2 Group 2
C3
D4
So now I want is when Group 1 is selected in filter A1 & B2 gets enabled and when Group 2 is selected C3 & D4 gets enabled and vice-versa.
Please help in achieving this.
Thanks,
Shan
LikeLike